> ## Documentation Index
> Fetch the complete documentation index at: https://docs.blockscout.com/llms.txt
> Use this file to discover all available pages before exploring further.
# Manual Deployment Guide
> Deploy Blockscout with a user-friendly UI and all microservices
🚗 [Autoscout is now available](/using-blockscout/autoscout), providing a simple one-click explorer deployment with Blockscout's optimized hosting infrastructure. Use it for early testing, modifications, and launching a full production-grade explorer. [**Get Started Now**](/using-blockscout/autoscout) **and have your explorer up-and-running in minutes.**
📗 This guide walks you through a new Blockscout deployment including the user-friendly UI frontend and installation of all microservices. If you'd prefer a more automated approach see the [docker-compose deployment page](/setup/deployment/docker-compose-deployment).
## A. Prerequisites
Please familiarize yourself with the [general requirements](/setup/requirements/requirements), [db storage requirements](/setup/requirements/database-storage-requirements), [JSON RPC requirements](/setup/requirements/node-tracing-json-rpc-requirements) and [Client setting](/setup/requirements/client-settings) requirements before installing Blockscout.
### Minimum Local Hardware Requirements
* CPU: 4core / 8core
* RAM: 8GB / 16GB / 32GB
* DISK: 120gb or 500GB NVME SSD or Standard SSD
* OS: Linux, MacOS
### Hosting Environment Hardware Requirements
If you are running Blockscout on a cloud server or other remote environment, see the [Hardware and Hosting Requirements](/setup/requirements/resource-requirements)
### Software Dependencies
For Erlang/Elixir, [asdf](https://asdf-vm.com/) is recommended to install and set the appropriate versions. Note the supported versions for Erlang/Elixir/Node are specified in the `.tool-versions` file. Additional Instructions for setting up the environment are available for [Ubuntu](/setup/deployment/manual-deployment-guide/ubuntu-setup) and [MacOS](/setup/deployment/manual-deployment-guide/macos-setup).
| Dependency | Mac | Linux |
| ---------------------------------------------------------------- | ------------------------- | --------------------------------------------------------------------------------------------------------------------------------------------------------------- |
| [Erlang/OTP 26](https://github.com/erlang/otp) | `brew install erlang` | [Erlang Install Example](https://github.com/poanetwork/blockscout-terraform/blob/33f68e816e36dc2fb055911fa0372531f0e956e7/modules/stack/libexec/init.sh#L134) |
| [Elixir 1.15.x](https://elixir-lang.org/) | `brew install elixir` | [Elixir Install Example](https://github.com/poanetwork/blockscout-terraform/blob/33f68e816e36dc2fb055911fa0372531f0e956e7/modules/stack/libexec/init.sh#L138) |
| [Postgres 14+](https://www.postgresql.org/) | `brew install postgresql` | [Postgres Install Example](https://github.com/poanetwork/blockscout-terraform/blob/33f68e816e36dc2fb055911fa0372531f0e956e7/modules/stack/libexec/init.sh#L187) |
| [Node.js 18.x.x](https://nodejs.org/en/) | `brew install node` | [Node.js Install Example](https://github.com/poanetwork/blockscout-terraform/blob/33f68e816e36dc2fb055911fa0372531f0e956e7/modules/stack/libexec/init.sh#L66) |
| [Automake](https://www.gnu.org/software/automake/) | `brew install automake` | [Automake Install Example](https://github.com/poanetwork/blockscout-terraform/blob/33f68e816e36dc2fb055911fa0372531f0e956e7/modules/stack/libexec/init.sh#L72) |
| [Libtool](https://www.gnu.org/software/libtool/) | `brew install libtool` | [Libtool Install Example](https://github.com/poanetwork/blockscout-terraform/blob/33f68e816e36dc2fb055911fa0372531f0e956e7/modules/stack/libexec/init.sh#L62) |
| [Inotify-tools](https://github.com/rvoicilas/inotify-tools/wiki) | Not Required | Ubuntu - `apt-get install inotify-tools` |
| [GCC Compiler](https://gcc.gnu.org/) | `brew install gcc` | [GCC Compiler Example](https://github.com/poanetwork/blockscout-terraform/blob/33f68e816e36dc2fb055911fa0372531f0e956e7/modules/stack/libexec/init.sh#L70) |
| [GMP](https://gmplib.org/) | `brew install gmp` | [Install GMP Devel](https://github.com/poanetwork/blockscout-terraform/blob/33f68e816e36dc2fb055911fa0372531f0e956e7/modules/stack/libexec/init.sh#L74) |
| Make | - | `sudo apt install make`if Debian 9 |
| G++ Compiler | - | `sudo apt install g++`if Debian 9 |
## B. Manual Deployment
The following guide contains 5 sections that cover a complete Blockscout installation.
1. [Prepare the backend](/setup/deployment/manual-deployment-guide#1.-prepare-the-backend)
2. [Run microservices](/setup/deployment/manual-deployment-guide#2.-run-microservices)
3. [Add the microservices integration to backend](/setup/deployment/manual-deployment-guide#3.-add-the-microservices-integration-to-the-backend)
4. [Run the backend](/setup/deployment/manual-deployment-guide#4.-run-backend)
5. [Run the frontend](/setup/deployment/manual-deployment-guide#5.-run-frontend)
## 1. Prepare the backend
**1)** Clone the repository
`git clone https://github.com/blockscout/blockscout blockscout-backend`
**2)** Change directories
`cd blockscout-backend`
**3)** Provide DB URL with your username `export DATABASE_URL=postgresql://username:password@localhost:5432/blockscout`
* **Linux:** Update the database username and password configuration
* **Mac:** Use logged-in user name and empty password (`export DATABASE_URL=postgresql://username:@localhost:5432/blockscout` )
* **Optional:** Change credentials in `apps/explorer/config/test.exs` for test env *Example usage:* Changing the default Postgres port from localhost:5432 if [Boxen](https://github.com/boxen/boxen) is installed.
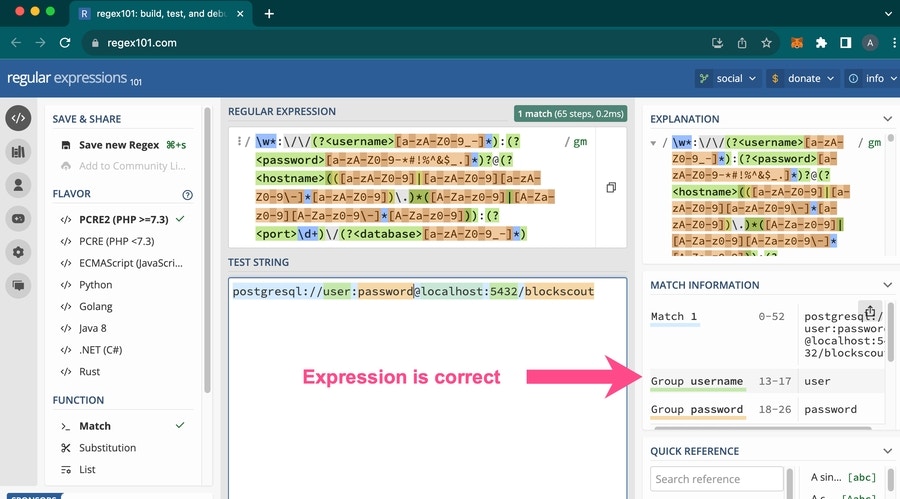
You can check the regex pattern for the db url via [https://regex101.com/](https://regex101.com/) with the following regular expression:
```
\w*:\/\/(?[a-zA-Z0-9_-]*):(?[a-zA-Z0-9-*#!%^&$_.]*)?@(?(([a-zA-Z0-9]|[a-zA-Z0-9][a-zA-Z0-9\-]*[a-zA-Z0-9])\.)*([A-Za-z0-9]|[A-Za-z0-9][A-Za-z0-9\-]*[A-Za-z0-9])):(?\d+)\/(?[a-zA-Z0-9_-]*)
```
 **4)** Install Mix dependencies and compile
`mix do deps.get, local.rebar --force, deps.compile`
**5)** Generate a new secret\_key\_base for the DB
`mix phx.gen.secret`
**6)** Copy keybase and export as an env (for example)
`export SECRET_KEY_BASE=VTIB3uHDNbvrY0+60ZWgUoUBKDn9ppLR8MI4CpRz4/qLyEFs54ktJfaNT6Z221No`
**7)** Export remaining [environment variables](/setup/env-variables) as needed.
CLI basic example:
```cpp theme={null}
export ETHEREUM_JSONRPC_VARIANT=geth
export ETHEREUM_JSONRPC_HTTP_URL=http://localhost:8545
export API_V2_ENABLED=true
export PORT=3001 # set for local API usage
export COIN=yourcoin
export COIN_NAME=yourcoinname
export DISPLAY_TOKEN_ICONS=true
```
**Notes:**
* The `ETHEREUM_JSONRPC_VARIANT` will vary depending on your client (nethermind, geth etc). [More information on client settings](/setup/requirements/client-settings).
* If you're in production environment, please, set `MIX_ENV=prod`. The current default is `MIX_ENV=dev` which is a slower and less secure setting. However, for development purposes, unsetting or setting is `MIX_ENV=dev` is preferred.
* To configure "**My Account**" section on the backend, see [https://docs.blockscout.com/for-developers/configuration-options/my-account-settings](https://docs.blockscout.com/for-developers/configuration-options/my-account-settings)
**8)** Compile the application:
`mix compile`
**9)** If not already running, start Postgres: `pg_ctl -D /usr/local/var/postgres start` or `brew services start postgresql`
Check [postgres status](https://www.postgresql.org/docs/9.6/app-pg-isready.html): `pg_isready`
**10)** Create and migrate database
`mix do ecto.create, ecto.migrate`
If you are in dev environment and have run the application previously with a different blockchain, drop the previous database: `mix do ecto.drop, ecto.create, ecto.migrate` Be careful since this will delete all data from the DB. Don't execute it on production if you don't want to lose all of the data!
**11)** Install Node.js dependencies
*Optional: If preferred, use `npm ci` rather than `npm install` to strictly follow all package versions in `package-lock.json.`*
`cd apps/block_scout_web/assets; npm install && node_modules/webpack/bin/webpack.js --mode production; cd -`
`cd apps/explorer && npm install; cd -`
`12)` Build static assets for deployment
`mix phx.digest`
**13)** Enable HTTPS in development. The Phoenix server only runs with HTTPS.
`cd apps/block_scout_web; mix phx.gen.cert blockscout blockscout.local; cd -`
**14)** Add blockscout and blockscout.local to your `/etc/hosts`
```
127.0.0.1 localhost blockscout blockscout.local
255.255.255.255 broadcasthost
::1 localhost blockscout blockscout.local
```
If using Chrome, Enable `chrome://flags/#allow-insecure-localhost`
**🎉 This completes the backend setup! Proceed to setup microservices.**
## 2. Run Microservices
You will use Docker to run 4 Rust microservices: smart-contract verification, smart-contract sol2uml visualizer, sig-provider, and stats services. These add additional functionality to your instance once everything is connected.
### Prerequisites
* Docker v20.10+
* Docker-compose 2.x.x+
### Commands
1. Go to the docker-compose directory
`cd ./blockscout-backend/docker-compose`
2. run docker-compose
`docker-compose -f microservices.yml up -d`
### Stats
* Stats will be served from [http://localhost:8080/](http://localhost:8080/)
* You can check, that service works by requesting [http://localhost:8080/health?service=](http://localhost:8080/health?service=). It should return `{"status":"SERVING"}`
### sig-provider
* sig-provider will be at [http://localhost:8083/](http://localhost:8083/)
* You can check, that service works by requesting [http://localhost:8083/health?service=](http://localhost:8083/health?service=). It should return `{"status":"SERVING"}`
### Sc-visualizer
A visualizer for smart contracts.
* sc-visualizer will be located at [http://localhost:8081/](http://localhost:8081/)
* Check the visualizer service works by requesting the [http://localhost:8081/health](http://localhost:8081/health) page - it should return `{"status":"SERVING"}`.
### **Sc-verifier**
A separate smart contract verification service.
* sc-verifier will be at [http://localhost:8082/](http://localhost:8082/).
* Check that the sc-verifier service works by requesting [http://localhost:8082/api/v2/verifier/solidity/versions](http://localhost:8082/api/v2/verifier/solidity/versions) page
```
{"compilerVersions":["v0.8.23+commit.f704f362","v0.8.22+commit.4fc1097e","v0.8.21+commit.d9974bed","v0.8.20+commit.a1b79de6","v0.8.19+commit.7dd6d404","v0.8.18+commit.87f61d96","v0.8.17+commit.8df45f5f","v0.8.16+commit.07a7930e","v0.8.15+commit.e14f2714","v0.8.14+commit.80d49f37","v0.8.13+commit.abaa5c0e","v0.8.12+commit.f00d7308","v0.8.11+commit.d7f03943","v0.8.10+commit.fc410830","v0.8.9+commit.e5eed63a","v0.8.8+commit.dddeac2f","v0.8.7+commit.e28d00a7","v0.8.6+commit.11564f7e","v0.8.5+commit.a4f2e591","v0.8.4+commit.c7e474f2","v0.8.3+commit.8d00100c","v0.8.2+commit.661d1103","v0.8.1+commit.df193b15","v0.8.0+commit.c7dfd78e","v0.7.6+commit.7338295f","v0.7.5+commit.eb77ed08","v0.7.4+commit.3f05b770","v0.7.3+commit.9bfce1f6","v0.7.2+commit.51b20bc0","v0.7.1+commit.f4a555be","v0.7.0+commit.9e61f92b","v0.6.12+commit.27d51765","v0.6.11+commit.5ef660b1","v0.6.10+commit.00c0fcaf","v0.6.9+commit.3e3065ac","v0.6.8+commit.0bbfe453","v0.6.7+commit.b8d736ae","v0.6.6+commit.6c089d02","v0.6.5+commit.f956cc89","v0.6.4+commit.1dca32f3","v0.6.3+commit.8dda9521","v0.6.2+commit.bacdbe57","v0.6.1+commit.e6f7d5a4","v0.6.0+commit.26b70077","v0.5.17+commit.d19bba13","v0.5.16+commit.9c3226ce","v0.5.15+commit.6a57276f","v0.5.14+commit.01f1aaa4","v0.5.13+commit.5b0b510c","v0.5.12+commit.7709ece9","v0.5.11+commit.22be8592","v0.5.10+commit.5a6ea5b1","v0.5.9+commit.c68bc34e","v0.5.8+commit.23d335f2","v0.5.7+commit.6da8b019","v0.5.6+commit.b259423e","v0.5.5+commit.47a71e8f","v0.5.4+commit.9549d8ff","v0.5.3+commit.10d17f24","v0.5.2+commit.1df8f40c","v0.5.1+commit.c8a2cb62","v0.5.0+commit.1d4f565a","v0.4.26+commit.4563c3fc","v0.4.25+commit.59dbf8f1","v0.4.24+commit.e67f0147","v0.4.23+commit.124ca40d","v0.4.22+commit.4cb486ee","v0.4.21+commit.dfe3193c","v0.4.20+commit.3155dd80","v0.4.19+commit.c4cbbb05","v0.4.18+commit.9cf6e910","v0.4.17+commit.bdeb9e52","v0.4.16+commit.d7661dd9","v0.4.15+commit.8b45bddb","v0.4.14+commit.c2215d46","v0.4.13+commit.0fb4cb1a","v0.4.12+commit.194ff033","v0.4.11+commit.68ef5810","v0.4.10+commit.9e8cc01b"]}
```
* You can also use the Blockscout endpoint for smart-contract verification if you prefer (instructions in the integration section)
To stop all microservices, run `docker-compose -f microservices.yml down`
To troubleshoot issues with a container, run `docker ps` to check which containers are not starting.
Check logs with `docker logs visualizer -f`
## 3. Add the microservices integration to the backend
Add the microservices env variables to the backend. Use the export command to add.
```javascript theme={null}
export MICROSERVICE_SC_VERIFIER_ENABLED=true
export MICROSERVICE_SC_VERIFIER_URL=http://localhost:8082/
export MICROSERVICE_VISUALIZE_SOL2UML_ENABLED=true
export MICROSERVICE_VISUALIZE_SOL2UML_URL=http://localhost:8081/
export MICROSERVICE_SIG_PROVIDER_ENABLED=true
export MICROSERVICE_SIG_PROVIDER_URL=http://localhost:8083/
```
The Blockscout team also provides an endpoint for smart-contract verification. To use, set the following for the `MICROSERVICE_SC_VERIFIER` envs
```javascript theme={null}
export MICROSERVICE_SC_VERIFIER_ENABLED=true
export MICROSERVICE_SC_VERIFIER_URL=https://eth-bytecode-db.services.blockscout.com/
export MICROSERVICE_SC_VERIFIER_TYPE=eth_bytecode_db
```
**🎉 This completes the microservices setup! Proceed to run the backend and frontend.**
## 4. Run backend
1. Return to the blockscout-backend directory `./blockscout-backend`
2. Run `mix phx.server`
The API will be available at [http://localhost:3001/api/](http://localhost:3001/api/)
## 5. Run frontend
The frontend can be added to the same high-level directory as the blockscout-backend or a different directory of your choice.
1. clone the blockscout frontend repository
`git clone https://github.com/blockscout/frontend blockscout-frontend`
2. change directories
`cd blockscout-frontend`
3. create a .env file, for example
`touch .env`
4. Add this minimal set of required env variables ([additional variables are available here](https://github.com/blockscout/frontend/blob/main/docs/ENVS.md))
```javascript theme={null}
NEXT_PUBLIC_API_HOST=localhost
NEXT_PUBLIC_API_PORT=3001
NEXT_PUBLIC_API_PROTOCOL=http
NEXT_PUBLIC_STATS_API_HOST=http://localhost:8080
NEXT_PUBLIC_VISUALIZE_API_HOST=http://localhost:8081
NEXT_PUBLIC_APP_HOST=localhost
NEXT_PUBLIC_APP_PORT=3000
NEXT_PUBLIC_APP_INSTANCE=localhost
NEXT_PUBLIC_APP_ENV=development
NEXT_PUBLIC_API_WEBSOCKET_PROTOCOL='ws'
NEXT_PUBLIC_WALLET_CONNECT_PROJECT_ID=
```
5. install dependencies
`yarn install`
6. run frontend
`yarn dev`
**🎉 Once completed, the frontend should be available at `http://localhost:3000`**
**Notes:**
* To configure the **My Account** section, you will add additional env variables on the frontend. See [https://github.com/blockscout/frontend/blob/main/docs/ENVS.md#my-account](https://github.com/blockscout/frontend/blob/main/docs/ENVS.md#my-account)
* More info related to the frontend is available at: [https://github.com/blockscout/frontend/blob/main/docs/CONTRIBUTING.md#local-development](https://github.com/blockscout/frontend/blob/main/docs/CONTRIBUTING.md#local-development)
**4)** Install Mix dependencies and compile
`mix do deps.get, local.rebar --force, deps.compile`
**5)** Generate a new secret\_key\_base for the DB
`mix phx.gen.secret`
**6)** Copy keybase and export as an env (for example)
`export SECRET_KEY_BASE=VTIB3uHDNbvrY0+60ZWgUoUBKDn9ppLR8MI4CpRz4/qLyEFs54ktJfaNT6Z221No`
**7)** Export remaining [environment variables](/setup/env-variables) as needed.
CLI basic example:
```cpp theme={null}
export ETHEREUM_JSONRPC_VARIANT=geth
export ETHEREUM_JSONRPC_HTTP_URL=http://localhost:8545
export API_V2_ENABLED=true
export PORT=3001 # set for local API usage
export COIN=yourcoin
export COIN_NAME=yourcoinname
export DISPLAY_TOKEN_ICONS=true
```
**Notes:**
* The `ETHEREUM_JSONRPC_VARIANT` will vary depending on your client (nethermind, geth etc). [More information on client settings](/setup/requirements/client-settings).
* If you're in production environment, please, set `MIX_ENV=prod`. The current default is `MIX_ENV=dev` which is a slower and less secure setting. However, for development purposes, unsetting or setting is `MIX_ENV=dev` is preferred.
* To configure "**My Account**" section on the backend, see [https://docs.blockscout.com/for-developers/configuration-options/my-account-settings](https://docs.blockscout.com/for-developers/configuration-options/my-account-settings)
**8)** Compile the application:
`mix compile`
**9)** If not already running, start Postgres: `pg_ctl -D /usr/local/var/postgres start` or `brew services start postgresql`
Check [postgres status](https://www.postgresql.org/docs/9.6/app-pg-isready.html): `pg_isready`
**10)** Create and migrate database
`mix do ecto.create, ecto.migrate`
If you are in dev environment and have run the application previously with a different blockchain, drop the previous database: `mix do ecto.drop, ecto.create, ecto.migrate` Be careful since this will delete all data from the DB. Don't execute it on production if you don't want to lose all of the data!
**11)** Install Node.js dependencies
*Optional: If preferred, use `npm ci` rather than `npm install` to strictly follow all package versions in `package-lock.json.`*
`cd apps/block_scout_web/assets; npm install && node_modules/webpack/bin/webpack.js --mode production; cd -`
`cd apps/explorer && npm install; cd -`
`12)` Build static assets for deployment
`mix phx.digest`
**13)** Enable HTTPS in development. The Phoenix server only runs with HTTPS.
`cd apps/block_scout_web; mix phx.gen.cert blockscout blockscout.local; cd -`
**14)** Add blockscout and blockscout.local to your `/etc/hosts`
```
127.0.0.1 localhost blockscout blockscout.local
255.255.255.255 broadcasthost
::1 localhost blockscout blockscout.local
```
If using Chrome, Enable `chrome://flags/#allow-insecure-localhost`
**🎉 This completes the backend setup! Proceed to setup microservices.**
## 2. Run Microservices
You will use Docker to run 4 Rust microservices: smart-contract verification, smart-contract sol2uml visualizer, sig-provider, and stats services. These add additional functionality to your instance once everything is connected.
### Prerequisites
* Docker v20.10+
* Docker-compose 2.x.x+
### Commands
1. Go to the docker-compose directory
`cd ./blockscout-backend/docker-compose`
2. run docker-compose
`docker-compose -f microservices.yml up -d`
### Stats
* Stats will be served from [http://localhost:8080/](http://localhost:8080/)
* You can check, that service works by requesting [http://localhost:8080/health?service=](http://localhost:8080/health?service=). It should return `{"status":"SERVING"}`
### sig-provider
* sig-provider will be at [http://localhost:8083/](http://localhost:8083/)
* You can check, that service works by requesting [http://localhost:8083/health?service=](http://localhost:8083/health?service=). It should return `{"status":"SERVING"}`
### Sc-visualizer
A visualizer for smart contracts.
* sc-visualizer will be located at [http://localhost:8081/](http://localhost:8081/)
* Check the visualizer service works by requesting the [http://localhost:8081/health](http://localhost:8081/health) page - it should return `{"status":"SERVING"}`.
### **Sc-verifier**
A separate smart contract verification service.
* sc-verifier will be at [http://localhost:8082/](http://localhost:8082/).
* Check that the sc-verifier service works by requesting [http://localhost:8082/api/v2/verifier/solidity/versions](http://localhost:8082/api/v2/verifier/solidity/versions) page
```
{"compilerVersions":["v0.8.23+commit.f704f362","v0.8.22+commit.4fc1097e","v0.8.21+commit.d9974bed","v0.8.20+commit.a1b79de6","v0.8.19+commit.7dd6d404","v0.8.18+commit.87f61d96","v0.8.17+commit.8df45f5f","v0.8.16+commit.07a7930e","v0.8.15+commit.e14f2714","v0.8.14+commit.80d49f37","v0.8.13+commit.abaa5c0e","v0.8.12+commit.f00d7308","v0.8.11+commit.d7f03943","v0.8.10+commit.fc410830","v0.8.9+commit.e5eed63a","v0.8.8+commit.dddeac2f","v0.8.7+commit.e28d00a7","v0.8.6+commit.11564f7e","v0.8.5+commit.a4f2e591","v0.8.4+commit.c7e474f2","v0.8.3+commit.8d00100c","v0.8.2+commit.661d1103","v0.8.1+commit.df193b15","v0.8.0+commit.c7dfd78e","v0.7.6+commit.7338295f","v0.7.5+commit.eb77ed08","v0.7.4+commit.3f05b770","v0.7.3+commit.9bfce1f6","v0.7.2+commit.51b20bc0","v0.7.1+commit.f4a555be","v0.7.0+commit.9e61f92b","v0.6.12+commit.27d51765","v0.6.11+commit.5ef660b1","v0.6.10+commit.00c0fcaf","v0.6.9+commit.3e3065ac","v0.6.8+commit.0bbfe453","v0.6.7+commit.b8d736ae","v0.6.6+commit.6c089d02","v0.6.5+commit.f956cc89","v0.6.4+commit.1dca32f3","v0.6.3+commit.8dda9521","v0.6.2+commit.bacdbe57","v0.6.1+commit.e6f7d5a4","v0.6.0+commit.26b70077","v0.5.17+commit.d19bba13","v0.5.16+commit.9c3226ce","v0.5.15+commit.6a57276f","v0.5.14+commit.01f1aaa4","v0.5.13+commit.5b0b510c","v0.5.12+commit.7709ece9","v0.5.11+commit.22be8592","v0.5.10+commit.5a6ea5b1","v0.5.9+commit.c68bc34e","v0.5.8+commit.23d335f2","v0.5.7+commit.6da8b019","v0.5.6+commit.b259423e","v0.5.5+commit.47a71e8f","v0.5.4+commit.9549d8ff","v0.5.3+commit.10d17f24","v0.5.2+commit.1df8f40c","v0.5.1+commit.c8a2cb62","v0.5.0+commit.1d4f565a","v0.4.26+commit.4563c3fc","v0.4.25+commit.59dbf8f1","v0.4.24+commit.e67f0147","v0.4.23+commit.124ca40d","v0.4.22+commit.4cb486ee","v0.4.21+commit.dfe3193c","v0.4.20+commit.3155dd80","v0.4.19+commit.c4cbbb05","v0.4.18+commit.9cf6e910","v0.4.17+commit.bdeb9e52","v0.4.16+commit.d7661dd9","v0.4.15+commit.8b45bddb","v0.4.14+commit.c2215d46","v0.4.13+commit.0fb4cb1a","v0.4.12+commit.194ff033","v0.4.11+commit.68ef5810","v0.4.10+commit.9e8cc01b"]}
```
* You can also use the Blockscout endpoint for smart-contract verification if you prefer (instructions in the integration section)
To stop all microservices, run `docker-compose -f microservices.yml down`
To troubleshoot issues with a container, run `docker ps` to check which containers are not starting.
Check logs with `docker logs visualizer -f`
## 3. Add the microservices integration to the backend
Add the microservices env variables to the backend. Use the export command to add.
```javascript theme={null}
export MICROSERVICE_SC_VERIFIER_ENABLED=true
export MICROSERVICE_SC_VERIFIER_URL=http://localhost:8082/
export MICROSERVICE_VISUALIZE_SOL2UML_ENABLED=true
export MICROSERVICE_VISUALIZE_SOL2UML_URL=http://localhost:8081/
export MICROSERVICE_SIG_PROVIDER_ENABLED=true
export MICROSERVICE_SIG_PROVIDER_URL=http://localhost:8083/
```
The Blockscout team also provides an endpoint for smart-contract verification. To use, set the following for the `MICROSERVICE_SC_VERIFIER` envs
```javascript theme={null}
export MICROSERVICE_SC_VERIFIER_ENABLED=true
export MICROSERVICE_SC_VERIFIER_URL=https://eth-bytecode-db.services.blockscout.com/
export MICROSERVICE_SC_VERIFIER_TYPE=eth_bytecode_db
```
**🎉 This completes the microservices setup! Proceed to run the backend and frontend.**
## 4. Run backend
1. Return to the blockscout-backend directory `./blockscout-backend`
2. Run `mix phx.server`
The API will be available at [http://localhost:3001/api/](http://localhost:3001/api/)
## 5. Run frontend
The frontend can be added to the same high-level directory as the blockscout-backend or a different directory of your choice.
1. clone the blockscout frontend repository
`git clone https://github.com/blockscout/frontend blockscout-frontend`
2. change directories
`cd blockscout-frontend`
3. create a .env file, for example
`touch .env`
4. Add this minimal set of required env variables ([additional variables are available here](https://github.com/blockscout/frontend/blob/main/docs/ENVS.md))
```javascript theme={null}
NEXT_PUBLIC_API_HOST=localhost
NEXT_PUBLIC_API_PORT=3001
NEXT_PUBLIC_API_PROTOCOL=http
NEXT_PUBLIC_STATS_API_HOST=http://localhost:8080
NEXT_PUBLIC_VISUALIZE_API_HOST=http://localhost:8081
NEXT_PUBLIC_APP_HOST=localhost
NEXT_PUBLIC_APP_PORT=3000
NEXT_PUBLIC_APP_INSTANCE=localhost
NEXT_PUBLIC_APP_ENV=development
NEXT_PUBLIC_API_WEBSOCKET_PROTOCOL='ws'
NEXT_PUBLIC_WALLET_CONNECT_PROJECT_ID=
```
5. install dependencies
`yarn install`
6. run frontend
`yarn dev`
**🎉 Once completed, the frontend should be available at `http://localhost:3000`**
**Notes:**
* To configure the **My Account** section, you will add additional env variables on the frontend. See [https://github.com/blockscout/frontend/blob/main/docs/ENVS.md#my-account](https://github.com/blockscout/frontend/blob/main/docs/ENVS.md#my-account)
* More info related to the frontend is available at: [https://github.com/blockscout/frontend/blob/main/docs/CONTRIBUTING.md#local-development](https://github.com/blockscout/frontend/blob/main/docs/CONTRIBUTING.md#local-development)