📗 This guide walks you through a new Blockscout deployment including the user-friendly UI frontend and installation of all microservices. If you’d prefer a more automated approach see the docker-compose deployment page.
A. Prerequisites
Minimum Local Hardware Requirements
- CPU: 4core / 8core
- RAM: 8GB / 16GB / 32GB
- DISK: 120gb or 500GB NVME SSD or Standard SSD
- OS: Linux, MacOS
Hosting Environment Hardware Requirements
If you are running Blockscout on a cloud server or other remote environment, see the Hardware and Hosting RequirementsSoftware Dependencies
For Erlang/Elixir, asdf is recommended to install and set the appropriate versions. Note the supported versions for Erlang/Elixir/Node are specified in the.tool-versions file. Additional Instructions for setting up the environment are available for Ubuntu and MacOS.
B. Manual Deployment
The following guide contains 5 sections that cover a complete Blockscout installation.- Prepare the backend
- Run microservices
- Add the microservices integration to backend
- Run the backend
- Run the frontend
1. Prepare the backend
1) Clone the repositorygit clone https://github.com/blockscout/blockscout blockscout-backend
2) Change directories
cd blockscout-backend
3) Provide DB URL with your username export DATABASE_URL=postgresql://username:password@localhost:5432/blockscout
- Linux: Update the database username and password configuration
- Mac: Use logged-in user name and empty password (
export DATABASE_URL=postgresql://username:@localhost:5432/blockscout) - Optional: Change credentials in
apps/explorer/config/test.exsfor test env Example usage: Changing the default Postgres port from localhost:5432 if Boxen is installed.
You can check the regex pattern for the db url via https://regex101.com/ with the following regular expression: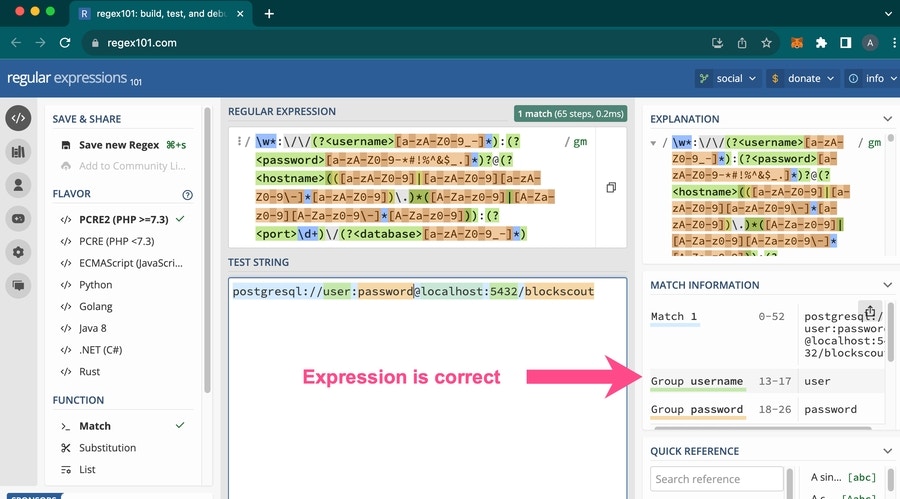
mix do deps.get, local.rebar --force, deps.compile
5) Generate a new secret_key_base for the DB
mix phx.gen.secret
6) Copy keybase and export as an env (for example)
export SECRET_KEY_BASE=VTIB3uHDNbvrY0+60ZWgUoUBKDn9ppLR8MI4CpRz4/qLyEFs54ktJfaNT6Z221No
7) Export remaining environment variables as needed.
CLI basic example:
- The
ETHEREUM_JSONRPC_VARIANTwill vary depending on your client (nethermind, geth etc). More information on client settings. - If you’re in production environment, please, set
MIX_ENV=prod. The current default isMIX_ENV=devwhich is a slower and less secure setting. However, for development purposes, unsetting or setting isMIX_ENV=devis preferred. - To configure “My Account” section on the backend, see https://docs.blockscout.com/for-developers/configuration-options/my-account-settings
mix compile
9) If not already running, start Postgres: pg_ctl -D /usr/local/var/postgres start or brew services start postgresql
10) Create and migrate database
mix do ecto.create, ecto.migrate
11) Install Node.js dependencies
Optional: If preferred, use
npm ci rather than npm install to strictly follow all package versions in package-lock.json.cd apps/block_scout_web/assets; npm install && node_modules/webpack/bin/webpack.js --mode production; cd -
cd apps/explorer && npm install; cd -
12) Build static assets for deployment
mix phx.digest
13) Enable HTTPS in development. The Phoenix server only runs with HTTPS.
cd apps/block_scout_web; mix phx.gen.cert blockscout blockscout.local; cd -
14) Add blockscout and blockscout.local to your /etc/hosts
If using Chrome, Enable
chrome://flags/#allow-insecure-localhost2. Run Microservices
You will use Docker to run 4 Rust microservices: smart-contract verification, smart-contract sol2uml visualizer, sig-provider, and stats services. These add additional functionality to your instance once everything is connected.Prerequisites
- Docker v20.10+
- Docker-compose 2.x.x+
Commands
- Go to the docker-compose directory
cd ./blockscout-backend/docker-compose - run docker-compose
docker-compose -f microservices.yml up -d
Stats
- Stats will be served from http://localhost:8080/
- You can check, that service works by requesting http://localhost:8080/health?service=. It should return
{"status":"SERVING"}
sig-provider
- sig-provider will be at http://localhost:8083/
- You can check, that service works by requesting http://localhost:8083/health?service=. It should return
{"status":"SERVING"}
Sc-visualizer
A visualizer for smart contracts.- sc-visualizer will be located at http://localhost:8081/
- Check the visualizer service works by requesting the http://localhost:8081/health page - it should return
{"status":"SERVING"}.
Sc-verifier
A separate smart contract verification service.- sc-verifier will be at http://localhost:8082/.
- Check that the sc-verifier service works by requesting http://localhost:8082/api/v2/verifier/solidity/versions page
it should return the list of compilers (click to see the sample response)
it should return the list of compilers (click to see the sample response)
- You can also use the Blockscout endpoint for smart-contract verification if you prefer (instructions in the integration section)
To troubleshoot issues with a container, run
docker ps to check which containers are not starting.Check logs with docker logs visualizer -f3. Add the microservices integration to the backend
Add the microservices env variables to the backend. Use the export command to add.The Blockscout team also provides an endpoint for smart-contract verification. To use, set the following for the
MICROSERVICE_SC_VERIFIER envs4. Run backend
- Return to the blockscout-backend directory
./blockscout-backend - Run
mix phx.server
5. Run frontend
The frontend can be added to the same high-level directory as the blockscout-backend or a different directory of your choice.-
clone the blockscout frontend repository
git clone https://github.com/blockscout/frontend blockscout-frontend - change directories
cd blockscout-frontend
- create a .env file, for example
touch .env
- Add this minimal set of required env variables (additional variables are available here)
- install dependencies
yarn install
- run frontend
yarn dev
Notes:
- To configure the My Account section, you will add additional env variables on the frontend. See https://github.com/blockscout/frontend/blob/main/docs/ENVS.md#my-account
- More info related to the frontend is available at: https://github.com/blockscout/frontend/blob/main/docs/CONTRIBUTING.md#local-development